Tel: 8838 8811
Fax: 8822 3218
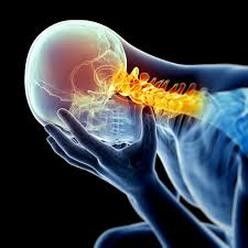
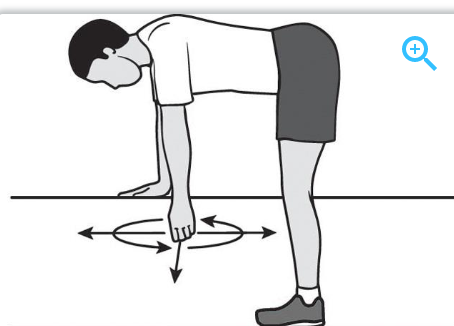
Headaches come in many forms, but did you know that some types of headaches can be treated through physiotherapy? A sub-group of headaches, known as cervicogenic headaches are a type of referred headache that comes from dysfunction around the neck.
There are many different causes for headaches that can occur. By looking out for these clinical signs you can see whether you may be suffering from a cervicogenic headache:
A physiotherapist will be able to determine whether your symptoms are being referred from the neck joints or surrounding muscles through a hands-on assessment. Physiotherapy treatment for cervicogenic headaches is safe and shown to be effective. Treatments will be tailored to correct the deficits found on assessment.
These may include:
With these types of headaches, the sooner you seek treatment, the sooner you will feel relief. When left longer, it becomes harder to correct the deficits and relieve your symptoms. So, consult your local physiotherapist today and get relief from your persistent headaches!
Running and Patellofemoral Pain
Kneecap pain or patellofemoral pain (PFP) is a very common condition, affecting up to 30% of elite athletes and 23% of the general population (Smith et al 2018)
There are several reasons as to why kneecap pain might occur, however research asserts that weakness of the quadriceps (often the inside quad muscle) plays a big role (Neal et al 2019)
Running requires sufficient strength in the hip, knee and ankle to support your body weight on one leg when you land. When muscles in these areas are weak, this can increase on the kneecap, further aggravating your pain.
To effectively rehab a sore knee, strengthening weak muscles to a point where we can re-introduce running is critical to decreasing risk of aggravation and pain.
THE BOTTOM LINE: If your physio advises you not to run, keep in mind that it won’t be forever, and you’re just laying a foundation to help you achieve your goals and keep you pain-free long term.
REFERENCES
Neal, B. S., Lack, S. D., Lankhorst, N. E., Raye, A., Morrissey, D., & van Middelkoop, M. (2019). Risk factors for patellofemoral pain: a systematic review and meta-analysis. British journal of sports medicine, 53(5), 270–281. https://doi.org/10.1136/bjsports-2017-098890
Smith, B. E., Selfe, J., Thacker, D., Hendrick, P., Bateman, M., Moffatt, F., Rathleff, M. S., Smith, T. O., & Logan, P. (2018). Incidence and prevalence of patellofemoral pain: A systematic review and meta-analysis. PloS one, 13(1), e0190892. https://doi.org/10.1371/journal.pone.0190892
Blog 42 - Case Study: Back Pain in Quarantine – Online Telehealth consults for Acute Lower Back Pain Treatment
Patient information:
40-year-old male held in quarantine following overseas travel. Patient had a sudden large reduction in physical activity. Following several days of sitting he began experiencing more and more back pain while sitting for long periods or lifting anything. Gentle movements and walking seemed to ease his pain.
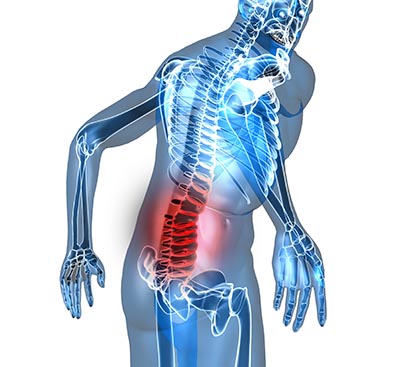
The patient described the pain as a tightness/stiffness along the side of his spine like the image. The pain would only rise to a 2/10 but would persist for 30-60minutes once aggravated
The patient’s goals were to:
- Return to jogging and hiking when possible
- Carry his 15kg child
- Return to general exercise at home
Physical examination:
Movements were observed through the telehealth call. The patient had 1-2/10 pain bending forward from standing, as well as arching backwards. Both movements were felt in the area highlighted in the image. The patient was then asked to feel through different parts of his lower back, to search for tender areas. This is useful to figure out which parts of the back (muscle or bone) are more likely to be affected. The patient described the tenderness to be through his muscle, with no soreness on his spine.
Strength testing: Very often after a period of no exercise and less standing, a person’s muscles can begin to become a bit weaker and lazier. Without being able to perform hands-on strength testing we used exercises that isolated specific muscles and had the patient rate his fatigue after ~20 repetitions. In a single leg hip thrust (testing glute strength) the patient was only able to perform 17 reps on his left (affected) side compared to 20+ on his right. During a side-plank test to assess his core strength on each side, the patient achieved 5 seconds less on his left compared to his right.
Findings:
These findings indicated some left sided muscle tightness through his lower back, as well as left sided muscle weakness through his core and glutes.
Treatment:
Self-massage with spikey ball through lower back muscles (2 minutes). Re-assessing bending forward resulted in more range and 0.5/10 pain.
Cobra stretch (on stomach stretching through lower back, 2 x 30seconds). Stretch reduced bending pain to 0/10.
Home exercise program: 2x daily cobra stretch + Single leg hip thrusts, side plank core strength, self-massage lower back with spikey ball.
Advice: Keep active at home, regularly get up and move or change positions. Recommended to use rolled up towel to help lower back posture.
REVIEW (1 week later):
Patient information: Patient had a significant improvement in pain and function. He was now able to lift without issues, as well as sit for over an hour with no discomfort. He reported that he performed all of his exercises regularly, and even attempted a jog which was pain-free.
Follow-up Assessment: Movements bending forward and arching back were both painless and further through range. The patient was also able to lift his son without any discomfort.
Discharge advice: The patient had his exercises progressed to help with muscle strength and was recommended to persist with these exercises for 6-8 weeks to help with further strength gains and reduce risk of re-aggravation. The previous advice to keep active during isolation was re-enforced and some general physical activity recommendations were given.
If you or anybody you know has had issues like this, feel free to book in an appointment with us online HERE.
With the current COVID-19 restrictions in place, many of us are getting accustomed to working from home. New workspaces can also introduce some new and uncomfortable postures that can cause pain during our work day. Workplace pain is very common but can be avoided! Setting up your workspace can be simple, easy and effective at keeping you pain-free while working from home.
The majority of office work is performed sitting at computers, and a simple change to your computer position can be the difference in how your neck and back feel after a long day at work.
Here are some simple strategies that you can utilise to avoid neck and back pain whilst you are sitting at your desk:
| WHAT TO DO | HOW TO DO IT | WHY IT HELPS |
| Sit upright with back against chair | Wiggle back in your chair | Places the spine in neutral posture to tolerate sitting forces
|
| Keep feet flat on the floor
| Ensure chair is not too high | Places even stress through the foot rather to avoid overstretching ligaments
|
| Relax shoulders while typing
| Actively try to relax shoulder every 20 mins | Reduces muscle tension in shoulders which assist with neck pain
|
| Set computer screen directly in front of you at eye level | Prop screen up on books | Prevents looking down which can strain the neck
|
| Bring keyboard and mouse as close to the body as possible | Bring key board and mouse close to edge of table | Prevents over-reaching/rounding the shoulders which irritates the middle back |
Backs don’t like to be in the one position for very long So, it’s important to get
up and m
ove around to prevent neck and back stiffness. Here are some suggestions:
If you find that you can’t take regular breaks, a good idea is to invest in a sit-stand desk. These desks allow you to change positions throughout your day and encourage you to change your posture regularly. There is evidence that standing instead of sitting is better for your overall health.

Having a good, well-constructed chair can help reduce risk of injury to your neck and back, as well as reduce fatigue and discomfort. Some characteristics of a good office chair are:
With a few of these simple changes you can be well on your way to preventing future neck or back pain issues. If you would like more information regarding neck or back pain you can book an appointment with one of our therapists HERE.
Extraordinary circumstances require extraordinary solutions. With climate we are currently in, many industries have been required to adapt. COVID-19 has been challenging, with a number of people subjected to quarantine or social distancing practices. This has given physiotherapists the opportunity to practice a new method of consulting and delivering the best health care outcomes – telehealth.
Telehealth physiotherapy is a live physiotherapy consult that is delivered online in the safety and comfort of your own home. It removes the in-person element of classic physiotherapy; whilst still providing expert care, advice and treatment.
Research has demonstrated that telehealth physiotherapy is an effective medium to decrease pain and improve the health of individuals with chronic musculoskeletal injuries (Dobson et al. 2014; Cottrell et al. 2018). To take part in a telehealth consult, all you need is a smartphone or webcam-enabled computer/laptop.
Telehealth consultations will share many similarities to an in-clinic physio consult, however, there will be some obvious differences:
For initial consultations, you will be provided with a detailed management plan delivered via email. This ensures you have all the information you need to fast-track your recovery.
At this point in time, Medicare and private health insurance rebates are unable to be provided for physiotherapy telehealth consultations. To accommodate this, we have reduced our consult fees.
If you are interested in telehealth consults, please call our friendly team on 8838 8811 to book. Alternatively, you can book online through our website by clicking HERE.
I am writing this as a medical professional, not as a public health specialist or epidemiologist. I am not an expert but I am growing increasingly frustrated by the political rhetoric, the grandstanding, the indecision, and the conflicting advice given to us by our leaders, and by my colleagues who are advising our leaders. I have a vested interest with respect to COVID-19 in that I am a health professional working with on average 120 patients a week. I work in two different hospitals and work from 3 different clinic sites in a week. I visit 2-4 rehabilitation hospitals each weekend. I am a father with children going to schools near a school which has had confirmed coronavirus cases now including a student, a member of a suburb that has confirmed cases of coronavirus. I have parents in their 70s who are travelling and think they are invincible. I have been following closely reports from both sides of the political spectrum not only in Australia, but the United States, Japan, and the United Kingdom. I have read numerous first-hand accounts of how COVID-19 has affected people from all walks of life, from medical professionals in China, Singapore, Italy, Germany, and France. I have listened and read advice from all the organisations I am affiliated with including the, Australian Health Practitioner Regulation Authority, Australian Medical Association, Australian Orthopaedic Association, Royal Australian College of Surgeons, American Academy of Orthopaedic Surgeons, International Society for Arthroscopy Knee Surgery and Orthopaedic Sports Medicine, and the European Society for Sports traumatology Knee Surgery and Arthroscopy. I have received reports from the hospitals I work at and managed by Ramsay Health, Healthscope, and the St Vincent’s Hospital Group.
I would like to make some important statements based on these reports:
We do not need ambiguous leadership, we need EFFECTIVE leadership. I ask our leaders, and our chief medical officer to STOP with the confusion and ambiguity. Do what is best for the country, not what is best for them, for the economy, or for their political party. REMEMBER your actions have far and reaching consequences. What you do will affect those people around you and those people around them and so on. That is how this virus spreads.
Australia is at a tipping point. We are moving from a containment strategy to a management phase of the virus. The chief medical officer says the risk of community base transmission is low, but the virus is now being transmitted more from a community base than a travelling base. WE need effective policies to be put in place NOW, not 48-72 hours after they have been announced. If it still more travel based, then limit travel. If it is predominately community based, limit the spread, through effective public health measures.
What our leaders and the experts are saying now is what European leaders were saying three-four weeks ago, and look where they are now. ACTION is needed, not words, not conspiracy theories, not a tit-for-tat approach from the political divide, not grandstanding from the conservative or liberal media, or from social media influencers who make statements without a knowledge base. To our leaders DO NOT make decisions based on what is in your best interest or the interest of your party. Make effective decisions based on best practice and evidence. The rate of COVID-19 is declining on a logarithmic case basis in China, South Korea, Japan, and Singapore. We need to be big enough to learn from these countries as to why that is and put in place similar measures. We also need to learn from those countries that are now experiencing widespread community transmission primarily Italy, Spain, France, and the United States. These countries irrespective of how prepared they say they were are now ill equipped to deal with the outbreak. Australia does not need to make the same mistakes, and I dare say should not make the same mistakes.
This virus is real, this virus kills at present 20-30x more people than the flu. It cannot be compared to Influenza, Ebola, MERS, or SARS. This is a novel virus that brings with it novel challenges in 2020. We are not living in 1918 or 2009. This virus is not a bad case of the flu, this virus is worse. For my colleagues in China, Italy, Spain, Iran, South Korea and soon to be France, Spain, the United States and others, having to make decisions on which patients get an ICU bed, those patients that get to live based on limited resources and clinical need in how to treat the sickest, is sickening. As a set of first world nations we should not decide who gets treatment as ALL patients should receive treatment as though they are the same, not based on age, gender, or ethnic group. Remember that with influenza our ICU beds are not inundated but with COVID-19 they will take up more ICU beds.
To the politicians, to the chief medical officer, and to the medical experts STOP the confusion with the advice being given. ALL of the organisations I am affiliated with have produced excellent advice to date based on up to date and best current practice, but have put in place measures both deterrent and prophylactic to stop or reduce the chance of COVID-19 affecting those patients. OUR leaders need to heed this advice rather than making individual decisions which are in their own self-interest. One of our politicians has been identified as having COVID-19. The group of Australian politicians who were in the same room when working on the stimulus package only need to look to similar gatherings that happened in Iran, Brazil, and the United States to see what happens when politicians came together for a moment in time.
The advice being given is if you are in close contact with someone who is unwell or has later been identified with COVID-19 and you remain well or subsequently become unwell, get yourself tested. It is that simple, but this seems to escape the rational thinking of some of our politicians and medical experts. This creates confusion, and in this time where Australia is at a tipping point, we do not need confusion. If our chief medical officer and politicians as our leaders, whom we look to for guidance and leadership, are not practicing what the health experts are saying, how do they expect us to follow suit. Remember the other people that you come into contact with might not be so lucky as most of us if we do get COVID-19. It is selfish to think that you are immune and therefore all of those around you are immune. As one parent has said, treat this virus as though you had an immunocompromised 4 year old son.
Handwashing is and effective prophylaxis against COVID-19. Wash for 20 seconds. It is a no brainer. Hand sanitiser is effective but not as effective as handwashing. Why practice hand hygiene, because this virus lives and can survive on surfaces that we then touch. It is airborne in that respect. It is not airborne how the measles virus can attach to dust particles that are then inhaled or settle on the skin. Yes, close contact with someone who has COVID-19 and sneezes on or around you can lead to inoculation. Wearing a face mask if you do not have COVID-19 is not going to help you as the virus is primarily surface transmission based. Wearing a face mask if you have COVID-19 may be slightly effective.
Social distancing is an effective prophylaxis against COVID-19. Virus spread requires vectors in close proximity to each other. I cannot fathom why events greater than 500 have been stopped from occurring 72 hours after the advice has been given, this is incredulous, and again needed EFFECTIVE leadership to be implemented immediately. This number based on what has occurred in other countries is too high. We need to reduce and limit the spread and reach of COVID-19, social distancing can do this. This is not about social isolation, this is about having a common sense approach. ALL of my professional organisations have stopped face to face meetings and moved to teleconferencing of some description. As of tomorrow all of my patients I see in clinic will have the option of having their appointment done via telehealth. I will also limit my travel to the rehabilitation hospitals I visit.
PLEASE do not panic buy. There are always people who are worse off than you, that do not have the same access as you. It was heartbreaking for my wife to be asked by an elderly man last week at the entrance of a supermarket if there was any toilet paper left and her reply being no, the look on his face was soul destroying. Do not be selfish for the sake of hoarding. Remember there are numerous food delivery services, and supermarket delivery services. Almost anything can be delivered to your door and will be in time.
DO NOT TRAVEL. It is as simple as that. The travel bans that have been imposed are too little too late. Likewise, Australia as an island has a geographical barrier to limit the spread but for whatever reason the countries that have had the ban applied needs to be greater. It does not matter if these countries are allies strategic or otherwise , or important trading partners, limiting travel will reduce the reach of COVID-19. Unfortunately, if our leaders do decide to place a travel ban, it is too little too late. We are at the point where community transmission is going to be far greater than transmission secondary to travel.
Elective surgery needs to be curtailed, not rushed through before COVID-19 becomes a problem as has been mentioned. This is a ridiculous decision. We do not need patients who have had surgery for elective conditions being rushed through, it makes no sense, it is dangerous, and hospitals need to be reducing the potential complications and burden to the public hospital system from doing this. Given the number of cases of COVID-19 is expected to double in the next 6 days from the current rate of 250, it does not take a mathematician to know how many cases Australia may have in 4 weeks. Remember what other countries leaders were saying 4 weeks ago.
These are frustrating and anxious times, we need effective leadership, we need effective leaders that we can look to help all of us ride out this pandemic. We all need to do our part through handwashing, social distancing, limiting travel, and being mindful of who we have been in contact with, and who we will be in contact with as it may be those people who are more at risk than yourself.
The iliotibial band has long been considered one of the worst enemies of the athlete and any individual with tight muscles, most commonly known as “that awful spot on the side of my leg that I get told to foam roll/get massaged out.” The iliotibial band is a type of tissue known as deep fascia, of which is an extension of tissue from two major muscles at our hip (gluteus maximus and the tensor fascia latae). For active individuals, the ITB or rather the outermost quad muscle (the vastus lateralis), is often home to significant levels of tension (myofascial tightness) and discomfort following increased bouts of physical activity, often in the form of running. Moreover, it is not uncommon for regular runners or even casual athletes to develop a condition known as ITB Syndrome, or “The Runner’s Knee,” where significant levels of discomfort and pain are experienced during running or jogging anywhere from the outside of the upper thigh down to the outside of the knee.
ITB syndrome or even increased levels of tightness and discomfort in the outer portion of the thigh often occurs due to poor running biomechanics. Even mild weaknesses above and below the level of the ITB can cause the hip and knee to collapse inward as our foot lands on the ground and absorbs the weight of our body - placing increased load on the ITB and producing pain. Most commonly, we find muscles such as those in the side of our bottom (primarily gluteus medius and gluteus minimus), deep in our bottom (piriformis, quadratus femoris etc.) and on the inside of our knee (vastus medialis obliquus) are not strong enough to prevent this collapse during running, and continually load the structures on the outside of our knee. With increasing levels of tightness in the ITB and the vastus lateralis and increased running loads, this can produce chronic pain over time, and deter many individuals from continuing activity.
The best way to prevent this pain is to consult your local physiotherapist, who can thoroughly assess your body and provide you with a tailored exercise program to address your individual needs. With this in mind, most physiotherapists will look to address the weak muscles throughout your lower body with strengthening exercises performed multiple times a week, and to release overactive and “tight” muscles that are likely to be the source of your pain and the muscular imbalances influencing your running technique.
At Prime Physiotherapy, running analysis and rehabilitation is one of our specialties, and we regularly assist people with ITB syndrome and other similar knee and running injuries recover and reach their full potential, and sometimes even get them to love foam-rolling that ITB.
Lower back pain is a very common condition that many people encounter in their day-to-day lives, with approximately 85% of people suffering an episode of back pain in their life. Of these individuals, between 50-80% will have at least one recurring bout of back pain, and 20-30% may suffer from ongoing chronic low back pain that severely impacts their ability to function and perform daily tasks. In fact, lower back pain is so prevalent within the general population that it is the number one cause of disability amongst those under the age of 45.
However, whilst back pain is most certainly one of the most common conditions, it is also one of the most misunderstood and catastrophized pains. As physiotherapists, almost every day we will have at least one person with lower back pain sitting in our office that is enormously anxious about whether they will ever recover, and whether their spine is still “stable.” Compared to several other joints and structures within the human body, the structure of the spine is inherently stable and in many cases, there is no specific structure within the spine itself causing pain. Often we find that shortened muscles, adaptive postures and movements are the cause of our pain, and that weaknesses in our lower body are causing these back muscles to take on more load in day-to-day activity. Through targeted exercise therapy through that of physiotherapy, most back pain cases will recover in 6-8 weeks.
Fortunately, in the absence of a number of secondary problems such as a loss of feeling or strength the arms or legs, issues going to the bathroom or unexplained weight loss – it is very unlikely that lower back pain is serious enough to require any X-ray or MRI imaging. In saying this, we also have no shortage of patients coming to us with several X-ray or MRI reports explaining that they have multiple disc bulges and osteoarthritic changes. Whilst a bulged disc may indeed be the specific cause behind some back pain cases, 80% of pain-free 50 year-olds will display disc degeneration on X-ray, and 40% of pain-free 30 year-olds will exhibit disc bulges on MRI.
Summary and Tips: Lower back pain is a common condition suffered by many, however it is a condition that should not be stigmatized and feared as it often is. The best way to combat back pain is:
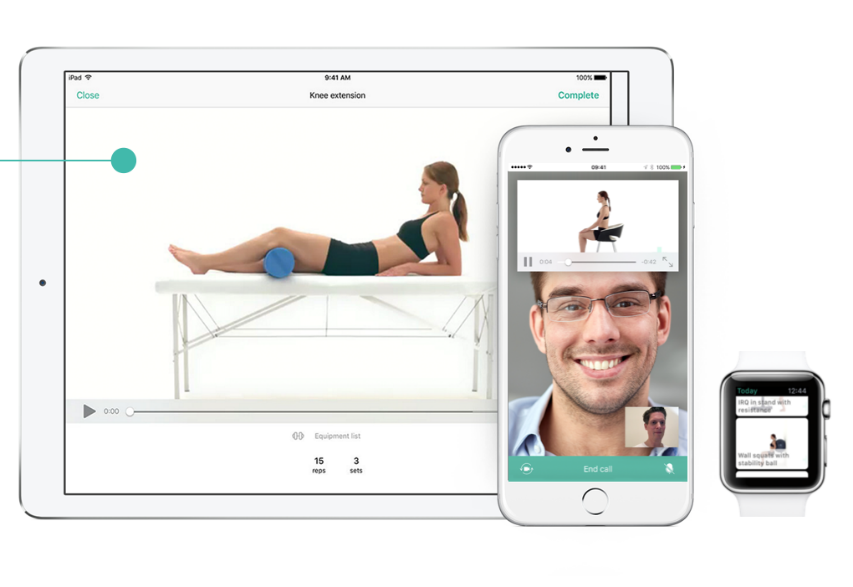
Historically one of the biggest roadblocks to the recovering patient is finding the time to perform our physiotherapy exercises at home. Whilst injuries can make everyday tasks quite difficult, we all lead busy lives and can’t always find the time or headspace to perform our exercises prescribed by our physiotherapist. On top of this, it can also be quite difficult to remember exactly what our physio has told us about performing our exercises. “What is my starting position? What muscle am I supposed to be feeling this movement in? How often did they say I need to be doing this?” These are all questions and thoughts that cross our minds throughout our rehab journey, and occasionally we may miss or forget some important details that are crucial to timely and effective rehabilitation.
Since 2012, Physitrack has been providing a modern and evidence-based solution that is free for physiotherapy clients. Through the PhysiApp, available for download on all iPhone and Android devices, patients are now able to take control of their rehabilitation through an interactive and informative platform made just for you. With Physitrack, clients can readily access the exercises prescribed by their physiotherapist along with the dosage, advice and instructions, and instructive exercise videos. This allows therapists to more effectively provide patients with a detailed insight into exactly what we wish to achieve together, and also to increase adherence to physiotherapy exercise programs.

Physitrack connects patients with their therapists through a platform designed to keep you on track with all your exercises and optimize the outcome of your recovery. This places all the most important information from your physiotherapist in the palm of your hand, and helping you work towards becoming a happier, healthier and pain-free version of yourself.
Blog 37: The Post op Shoulder: Weeks 6+

Following on from our previous blog regarding ‘The Post-op Shoulder’, we will now discuss a rehabilitation program for the post-op shoulder after 6 weeks. From this phase you will usually be returning to full range of motion and should have began some form of strengthening to your shoulder blade and rotator cuff muscles. You may also have the all-clear to return to running, which should start low intensity and slowly built back up to pre-injury levels
Weeks 6-8:
Range of motion:
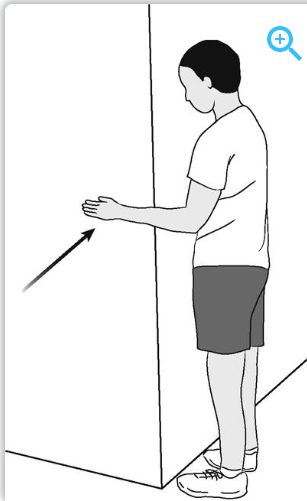
Once your surgeon has given the all clear, it is time to start increasing your shoulder rotation range of motion in different shoulder positions. This should be started by slowly increasing how far you lift your arm to the side, while rotating the arm at the elbow.
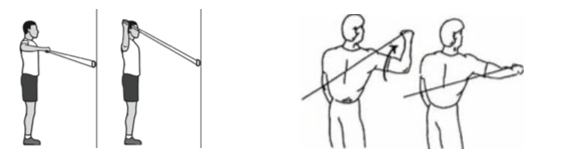
Strength:
Strengthening your rotator cuff through range and with resistance. Holding a theraband with your elbows bent at 90 degrees, rotate your arm from your elbow either toward your stomach, or away. Repeat roughly 10-15 x 3, daily.
Internal Rotation: External Rotation:
Shoulder blade (Scapula) strengthening is also very important for the movement of your shoulder. These can be performed with more weight. Aim to perform 10x3 each session and 3-4 times per week.
Shrug: Rows:
Weeks 8-10:
Strengthening can be progressed here to increased weight or resistance. Rotator cuff strengthening can be performed with the arm at 45 degrees to the body. Increased resistance can be applied to shoulder flexion and abduction (raise arm forward and to side) but not to be performed above shoulder height.
Range of motion exercises progressed until full range of motion is achieved.
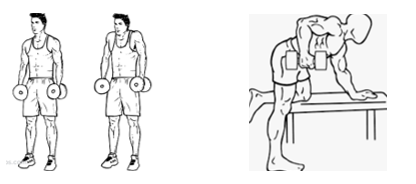
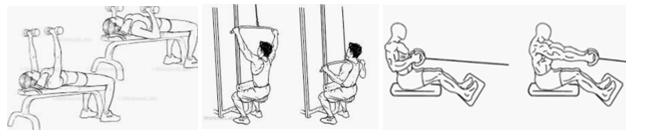
Weeks 10-12:
Strengthening exercises can most likely now be performed above shoulder height. Rotator cuff strengthening can be progressed by performing rotations with your arm at 90 degrees (shoulder height). Once this is achieved pain free, exercises such as bench press, lat pull-downs, shoulder press and seated rows can be started.
Shoulder External rotation at 90 degrees: Shoulder Internal rotation at 90 degrees:
Returning to sport drills can be re-introduced once full range is achieved. Contact drills should be avoided.
Weeks 12+:
Exercises should be mostly gym-based and focusing on strengthening the operated shoulder to equal or better than the non-operated shoulder. Once the strength of both sides is equal, full contact drills can begin. It is recommended to trial a 2-3 weeks of full training with normal match-simulations before returning to competitive sport.
Chest press: Lat Pulldown: Seated Row:
As with most rehab it is very important to consult a therapist or surgeon following surgery. The above exercises are a brief summary of what could be involved and how long it may take to return to sport but are a guide only. If you or anybody you know have recurrent shoulder problems or are booked in for shoulder surgery, feel free to book in a consult with one of our therapists HERE.
The Post-op Shoulder (Weeks 0-6)
Shoulder surgery is quite a debilitating procedure and it is very important to rehabilitate afterwards to ensure full range and strength returns, prevent frozen shoulder and assist in returning to your everyday activities. A physiotherapist can assess your shoulder and work out the best methods to help improve the way your shoulder functions following surgery.
Always check with your surgeon or physiotherapist before beginning any exercise program post-surgery. You should also always use pain as a guide to slow down during your exercises, as too much pain can delay your recovery. The exercises below are what you can expect your physio to prescribe to you at each stage of your rehab for the initial 6 weeks.
Week 0-2:
Range of motion exercises: Should be performed for 60-90 seconds each, 3 times per day
Pendulums: Gently rock your arm back and forth, side to side and in circles
Week 2-4:
Range of motion (active assisted): Use your other arm or a wall to assist your arm through range. Hold each stretch for a count of 5 and repeat 10 times. Perform 3 times per day (This is just a few examples of many exercises your therapist may prescribe to you)
Assisted shoulder flexion
Wall Crawls
Week 4-6:
Range of motion: Progress range for each exercise as previous.
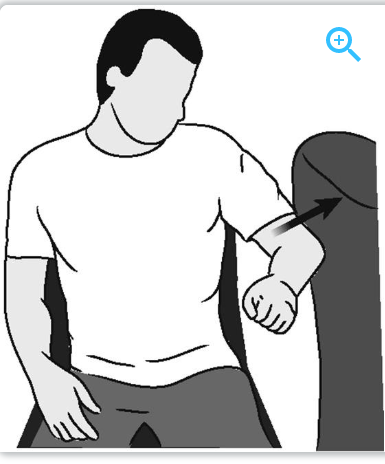
Strength: Sub-maximal pain free strength exercises against resistance but not through range of motion (using your muscles but they don’t move). Hold each exercise for 10 seconds and repeat 3 times. Perform each 3 times per day.
External Rotation:
Internal Rotation:
Abduction:
If you or anybody you know is about to have shoulder surgery and would like to be guided through their post-surgery rehab, feel free to book in to see one of our therapists HERE.
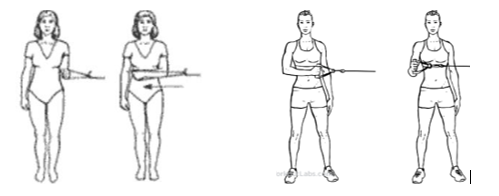
Thoracic Outlet Syndrome (TOS) is a group of conditions that happen when blood vessels and nerves are compressed between your first rib and your collarbone. This can cause pain in your neck and shoulders as well as cause numbness or hot/cold sensations in your fingertips. Thoracic outlet syndrome can be caused by several different things but is usually due to trauma such as a fall or car accident or sustained poor postures.
Thoracic Outlet Syndrome can present with many different symptoms but can be classified depending what structure is involved
If Thoracic Outlet Syndrome is left untreated it can lead to permanent nerve or blood vessel damage. Basic things you can do to prevent symptoms worsening is to rest with your elbows supported and shoulders elevated as well avoiding carrying heavy objects. Each of these prevent the nerves and vessels that pass through the thoracic outlet from being stretched. Repetitive movements and sustained postures can also both increase symptoms. Your therapist will likely develop a program to strengthen the muscles of your shoulder and shoulder blade in order to improve posture, assist with shoulder movement and control as well as prevent re-occurrence.
If this sounds like anything that you or anybody you know are suffering with, feel free to book in a consultation with one of our therapists HERE.
For conditions such as subacromial bursitis (bursitis of the shoulder) there are many different treatment options available. For most people, they will be recommended multiple options to reduce their pain and fix their problem. These include physiotherapy exercise, physiotherapy for manual therapy (massage, dry needling etc) cortisone injections, anti-inflammatories and surgery. But which of these is best?
Subacromial bursitis is a condition where the bursa (a fluid-filled sac used as a cushion underneath bone) starts to get inflamed due to compression between the acromium on the shoulder blade and the head of the humerus (arm bone).
A common reason this happens is poor glenohumeral rhythm. This is when the arm moves through range without the shoulder blade moving efficiently with it. When a muscle is injured or not activating effectively this rhythm becomes poor, making the sub-acromial space to get jammed up, causing inflammation of the bursa.
Cortisone injection is a common treatment strategy for subacromial bursitis. The aim of this is to reduce the inflammation of the bursa to reduce the amount of pain. This method is usually effective at reducing pain for the first 6 weeks, but it does very little in terms of fixing the initial cause of the problems.
Physiotherapy has been found to be superior to cortisone injections for pain reduction, shoulder movement and shoulder function in the long term (6 months). Specific exercises to target muscles of the shoulder and shoulder blade help re-train the glenohumeral rhythm, to prevent the bursa being aggravated. Manual therapy with specific exercises has been shown to be even more effective than the exercises alone.
Surgery is not indicated and should only be considered if patients have had no success following physiotherapy and injection and if the reason for the pain is a mechanical lesion of bone spur.
In summary, cortisone injections are effective at giving short-term pain relief, but quite often the reason for the pain is more complicated and requires physiotherapy input for long-term pain relief.
If you or anybody you know has shoulder pain as above, or have trialed cortisone injection without long-term pain relief, feel free to book yourself in to see one of our therapists HERE or contact us on Facebook.
Should I Get my Ankle Checked?
Ankle sprains are a common sporting injury and most will recover without further input. For many people this is not the case, and their injury can hang around with pain, stiffness or both. Evidence shows that the ankle also has one of the highest re-injury rates of any injury. So, if you have had a significant injury, or more than one injury to an ankle, it is important to rehabilitate the injury completely.
Acute injuries:
If you have just hurt your ankle there are a few things you can do to check if you require some professional input. The Ottawa ankle rules are a handy guide to check to see if you should get an X-Ray of your ankle to assess for a fracture. If any of the following apply you may have a fracture;
Longer-term injuries:
If an injury has occurred and is still giving signs of sustained pain, inflammation, looseness or unsteadiness it is recommended to have a physiotherapist assess your ankle. Some other ways of checking to see if you may need physiotherapy input is through the following mini tests that you can perform yourself;
If any of the above mini tests seem different between each side your physiotherapist can help with the following things;
If you or anybody you know has a persistent or re-occurring ankle injury, feel free to book an appointment with one of our therapists HERE.
Whiplash
![]()
Whiplash is a common neck injury that occurs from quick acceleration-deceleration. It is frequently found following rear-end or side-impact car accidents but can also happen during falls or whilst playing sport. This impact can result in several different bony or soft-tissue injuries (whiplash injury) which can then turn into other issues referred to as Whiplash Associated Disorders (WAD).
Structures that can be affected in a whiplash injury can consist of;
Causes of pain may be to any of these tissues, though there may be secondary swelling, bleeding or inflammation which may create pain in other structures.
Whiplash disorders can present with a combination of motor, sensory and psychological distress. The most common symptoms are headaches and/or neck pain that is constant or movement provoked. Other symptoms can include;
A physiotherapist will likely prescribe you with exercises to encourage movement of the neck. These may include postural exercises, strengthening, stretching and positioning. It is recommended to not use a collar after neck injury following a whiplash event due to the increased likelihood of the neck getting stiff.
We have recently updated our systems to make it easier for TAC patients to claim. If you or anybody you know has had a whiplash injury feel free to book an appointment with one of our therapists HERE.
Subacromial Impingement syndrome
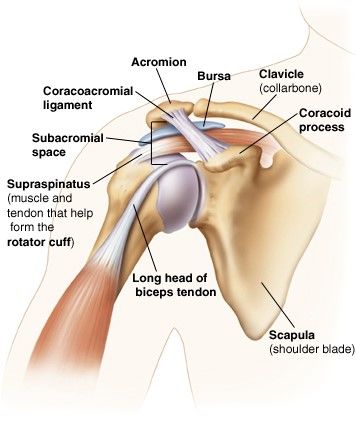
Subacromial impingement syndrome (SIS) is a term that describes pain to any structure in the subacromial space of the shoulder (as seen in the image). This can include conditions such as subacromial bursitis, rotator cuff tendinopathy, biceps tendinopathy and many more. It is usually described as pain at the front or side of your shoulder during movements such as raises your arm to the front or to the side. SIS is one of the most common complaints of shoulder pain in Australia.
People with subacromial impingement generally suffer from persistent pain without a known cause. Patients will typically have pain moving their arm from 70° to 120° to the side when standing or laying on their side.
Treatment for subacromial impingement depends on current pain and function. Physiotherapy is typically recommended for 12 months before surgical opinion.
Your physiotherapist will likely manage you with the following treatments;
If you or anybody you know has a painful shoulder or thinks they may have subacromial impingement, feel free to book in with one of our therapists HERE.
Balance
Poor balance can be an enormous burden for people and will often lead to a higher risk of falls and injury. Balance requires several systems in your body to be functioning well, which may make diagnosing your reason for poor balance difficult. Fortunately, a well-designed physiotherapy program can usually improve your balance and reduce your risk of injury.
Balance relies on three different systems in your body (vision, muscles/joints and vestibular/inner ear). If any of these systems has a flaw it will need to be rehabilitated or other systems trained harder. For example, inner ear conditions such as positional vertigo (BPPV) can be treated with certain head movements, whilst those with poor vision would need to train their leg muscles to be stronger.
Conditions which may affect balance can include;
Your physio can assess your balance and mobility and determine where your issues come from. They will then help create a specific exercise program for you to address these issues. It will usually involve practicing tasks that you may find difficult or strengthening weak muscles in your legs. These exercises must be targeted at your level. Any exercise too easy wont challenge you enough, but an exercise too difficult won’t improve you.
If you or anybody you know has balance issues, feel free to book in with one of our physiotherapists HERE for a consult.
Patella (kneecap) dislocations
Dislocations of the patella (Kneecap) are a traumatic injury that occurs in sporting and non-sporting populations. The patella sits on the top of the end of your femur (thigh bone) and is supported by several ligaments, muscles and bony ridges to stay in place. Occasionally when twisting the leg with a fixed foot on the ground some of these ligaments can tear, allowing the patella to dislocate to the side of your knee. There can be several reasons why your kneecap could dislocate such as;
A dislocated patella will present with some common complaints such as
Management:
It is best to get your knee imaged with an MRI or X-Ray after dislocation to rule out any bony fractures and assess the degree of damage. Physiotherapy is the most common form of management after a dislocation and aims to reduce pain, improve function, and prevent future dislocations. Your therapist will give you exercises aimed balancing the strength between your inner/outer knee, as well as range of motion exercises and balancing exercises to prevent future re-occurrences. Your therapist may even recommend using a brace or tape on your knee while playing sport in the future to prevent future injuries.
If you or anybody you know has knee issues or dislocated a joint before, feel free to book in a session with on of our therapists HERE.
Injury prevention/FIFA 11+
What is Injury Prevention?
The role of injury prevention in sports has two main roles. Firstly, it aims to prevent injuries in those who have no history of injury, and secondly, prevent re-injury to players who have had an injury in the past (eg previous hamstring injury).
FIFA11+:
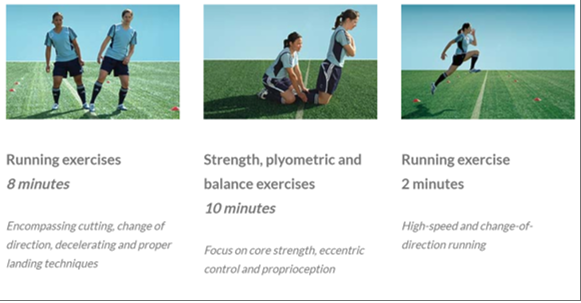
The FIFA11+ is a program designed to prevent injuries in soccer, though can be carried over to Australian Rules Football. The program takes 20 minutes and is designed to be completed twice a week. The program can be used in place of a traditional warm-up at training sessions. The program has been shown to reduce the risk of injury by 30% when compared to standard warm-up programs, and can reduce to risk of more severe injuries such a ACL rupture by 50%.
What is involved:
The program requires no equipment and is broken up into three components. Each of these components have three difficulty levels (Level 1, 2, 3) that progressively get more difficult. This allows for further gains throughout the season.
The first phase consists of exercises that you may consider part of a normal warm up, such as run-throughs, Z-Line running etc. The second phase consists of body weight strengthening exercises such as Nordic hamstring curls, bridges and squats to activate and strengthen key muscle groups. The final two minutes consists of higher intensity sprinting, bounding and change of direction skills.
If you would like any more information regarding injury prevention and the FIFA11+ program, feel free to organize a session with one of our clinicians HERE.

Piriformis syndrome is a condition where the piriformis muscle compresses the sciatic nerve. The piriformis is a muscle deep beneath your glutes/buttocks, near the top of the hip joint. The sciatic nerve is a thick and long nerve that starts from your lower spine and travels down the back of your leg. This nerve passes alongside or through the piriformis muscle and can be compressed when the piriformis is tight.
Piriformis syndrome usually starts with pain, numbness or tingling from the buttocks or down the back of the leg. Pain may come on from excessive sitting, running or climbing stairs, as well as when pushing into the buttock. Similar pain and numbness can be present in several other pathologies, so an assessment from your therapist is important.
Treatment for piriformis syndrome can be as simple as avoiding aggravating activities, such as extended periods sitting or long-distance running. If this is not effective your therapist will assess you for muscle weaknesses or tightness and prescribe exercises and stretches to relieve the pain.
Manual therapy such as deep tissue massage, dry needling and myofascial release are also effective at reducing piriformis tightness.
If you or anybody you know has symptoms of piriformis syndrome, feel free to book an appointment online with one of our therapists HERE.
A very common question we receive in our clinic is whether to put heat or ice onto an injury. Both treatments have their advantages, and both can be pain-relieving but when is the best time to use each?
As a general rule ice should be used if you have recently injured an area, have recently had surgery or a procedure, or just finished an aggravating activity like playing sport. Icing an area will cause blood vessels to constrict, which limits bleeding, swelling and inflammation into the area. This also has the added effect of helping with pain in the area.
When to avoid icing:
How to ice:
Heat has a great affect on injuries that are no longer acute or recent. It is most useful in warming up stiff or scarred muscles, as well as relieving pain and spasm in neck and back injuries. Heat can increase metabolic activity, increase circulation, increase movement of soft tissues like muscle and can relieve spasms. Using heat on a recent injury will increase the inflammation in the area, which may cause more pain and swelling, which will slow your recovery in the long run. We recommend heating an injury after about 5-7 days to help bring in blood to the area with important nutrients for recovery.
When to avoid heat:
How to heat:
If you have any questions or need help rehabilitating an acute injury, feel free to book an appointment with one of our therapists HERE.
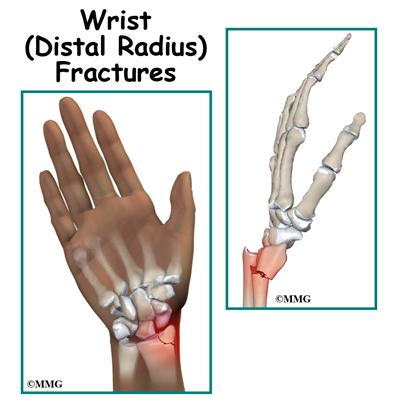
Distal Radius fractures, or wrist fractures, are a break of the end of the Radius, the larger of the two forearm bones. These fractures are often caused by falling on out-stretched hands, especially in osteoporotic populations, though can often happen in sporting situations and are very common in younger people.
An X-Ray is required to diagnose a Distal Radius fracture, though you may be suspected of one if you have sharp pain at the wrist, rapid onset swelling or a wrist deformity. An X-ray will also be required to determine if the bone is displaced, or intra-articular, which may require surgery.
It is important to get physiotherapy following cast-removal so that you can return to function as soon as possible. Your therapist will focus on increasing your range of motion and getting your wrist strength back to normal levels with manual therapy and home strengthening exercises. Your therapist will also slowly re-introduce you to normal daily tasks and sport-specific movements in a safe manor so that you don’t have any re-occurrences.
Outcomes:
Almost all distal radius fractures heal well to an extent regardless of age. Malunion, which is a poor union of the bones can occur and may lead to long term stiffness, reduced range of motion, reduced grip strength and residual pain.
If you or anybody you know has a fracture, or requires any rehabilitation for their wrists, feel free to book and appointment HERE.
Most people have experienced muscle cramps before, but what are they and why do they happen?
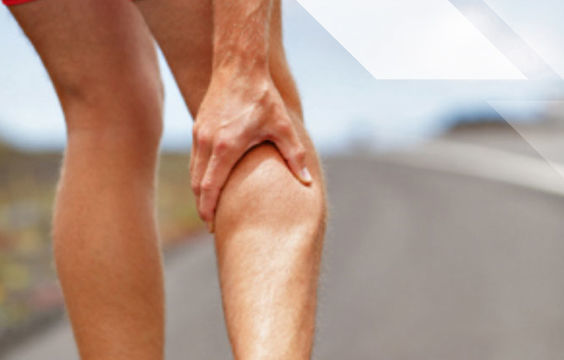
Cramps are an uncontrollable muscle contraction or spasm which can be quite painful and debilitating. Calves and feet are the most common muscles to cramp, but any muscle can be affected. They can be harmless and will usually resolve by itself, though chronic, long term cramping can be a sign of underlying medical conditions.
The exact cause of cramping is somewhat unknown, but likely risk factors that may cause cramping include;
Most cramps will resolve themselves with a bit of rest. If you are experience unrelenting cramping there are a number of things you can do to resolve them.
If you or anyone you know may benefit from advice or treatment for cramping, book in to see one of our therapists HERE.
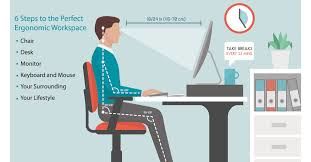
Getting pain at work? Workplace pain is very common but can be avoided! Setting up your workspace can be simple, easy and effective at making you pain-free at the end of your workday.
Pay attention to the way you are sitting. There are some simple positions that you can utilise to avoid neck and back pain whilst you are sitting at your desk;
Backs don’t like to be in the one position for very long so its important to get up and move around to prevent neck and back stiffness. Going for a 2 minute walk or stretch can help relieve your muscles and make you feel more refreshed. Try getting up every 15-30 minutes if possible, to get your blood flowing and muscles moving.
If you find that you can’t take regular breaks, a good idea is to invest in a sit-stand desk. These desks allow you to change positions throughout your day and encourage you to change your posture regularly. There is also evidence that standing instead of sitting is great for your overall health.
If this isn’t possible but you would like to make your traditional desk more ergonomic, try increasing the height of the desk to encourage sitting up and avoid slouching, but not so big that you must reach for your keyboard or to do work.
Having a good, well-constructed chair can help reduce risk of injury to your neck and back, as well as reduce fatigue and discomfort. Some characteristics of a good office chair for you consist of;
Due to the majority of office work being done at computers, a simple change to your computer position can be the difference in how your neck and back feel after a long day at work. Try the following tips to better position your computer and desk;
With a few of these simple changes you can be well on your way to preventing future neck or back pain issues. If you would like more information regarding neck or back pain you can book an appointment with one of our therapists HERE.
Dry Needling is the use of a fine needle to release knots (trigger points). It is a safe and effective technique to both assess and to treat tight muscles and muscle-related pain. The technique will usually involve needling a trigger point multiple times in order to reduce a patient’s symptoms. If done accurately the patient will get a muscle twitch as the knot is released, which will reduce muscle tension and pain.
How can it help?
Dry Needling can help with your injuries through various methods
With the use of the above methods, Dry Needling can help with a wide range of conditions such as;
It is highly recommended that if any of the following applies to you, you should let your therapist know before needling.
If you would like to utilise dry needling for any of your aches or pains feel free to book in with one of our clinicians HERE
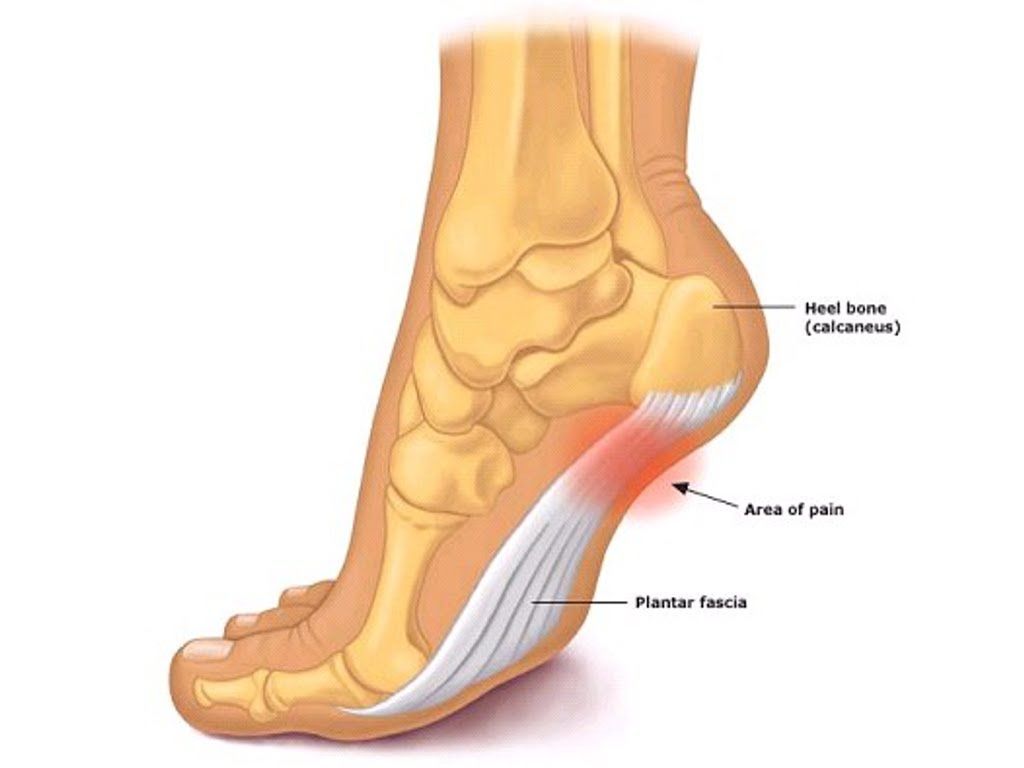
Plantar Fasciitis is a common cause of foot pain, usually felt on the inside of your heel. The plantar fascia is a thick tissue that runs from your heel, to the base of your toes. Plantar Fasciitis is inflammation of this tissue which can be due to a range of causes such as;
The main symptom of Plantar Fasciitis is pain on the inside or under your heel. This pain is usually worse for the first few steps in the morning, of after being seated for an extended time, though may also occur after long periods of standing or intense activity.
The management of Plantar Fasciitis will usually begin with a thorough assessment of your foot and lower legs. Following this assessment your Physio will give you specific stretches or strengthening exercises aimed towards your deficits. Other adjuncts such as rigid taping and orthotics may also be utilized. Most patients find success in this conservative approach, though some will require medical input.
Once the initial pain and inflammation has reduced and movement issues are identified a guided return to sport/activity program will be developed for you. For most people your rehab will look somewhat like this;
If you or anybody you know thinks that they are suffering from Plantar Fasciitis do not hesitate to book in a session with a Physiotherapist by clicking HERE.
By Jake D'Elia

Private Health Insurances are going through some changes to the items that they cover. These are due to occur on the 1st of April this year.
One of these changes is that Pilates Classes will no longer be claimable through health insurance. However, there are some exceptions to this.
Unfortunately, a number of healthcare practices have been using pilates as a generalized exercise program where all clients are prescribed the same set of exercises in large group classes (6 or more). This type of treatment model doesn’t allow clients to get the best outcomes as each client’s problems/deficits are different. So, a general exercise program will not be suitable to help the majority of people recover. As a result, the evidence behind this type of generalized “Pilates” class is poor; and so Private Health Insurers have removed Pilates from the list of claimable items unless certain criteria are met…
YES, so long as the following criteria are met by the healthcare provider (Prime Physio):
There will be very little change to the group exercise classes. Asides from implementing a quick test at the start and end of the class, they will run as normal. You will still be able to claim the rebate for your classes through your private health insurance as previous.
The major difference will be the name change from Clinical Pilates Exercise Classes to Physio Exercise Classes.
Stretching: when, how and why?
By Michael Stizza

Stretching is very common in the athletic population from sports people to gym goers and the yoga fanatics. But what’s the best way to do it, and why?
To fully understand stretching, we must understand the different types of stretching, when they are useful, and how to implement them in to our activity routine. Typically, there are three common variations of stretching that are talked about:
When looking to implement stretching into your training regime, it is important to pick the correct type of stretch that will compliment your goal at the time. Below are typical guidelines found in the research:
Mostly, stretching is about finding what is right for you. If you have had success with a routine in the past, it’s best to continue what works for you. If you are just starting out, or looking to change your routine, follow the above guidelines and monitor your change in performance.
If you are still unsure of what to do for your preparation or recovery, book in and get some individualised advise to keep you on the track - fitter and ready to go!
References:
Page P. Current concepts in muscle stretching for exercise and rehabilitation. Int J Sports Phys Ther. 2012; 7(1):109-19. Available from: http://www.ncbi.nlm.nih.gov/pubmed/22319684.
High Ankle Sprains – Syndesmosis Injury
By Michael Stizza
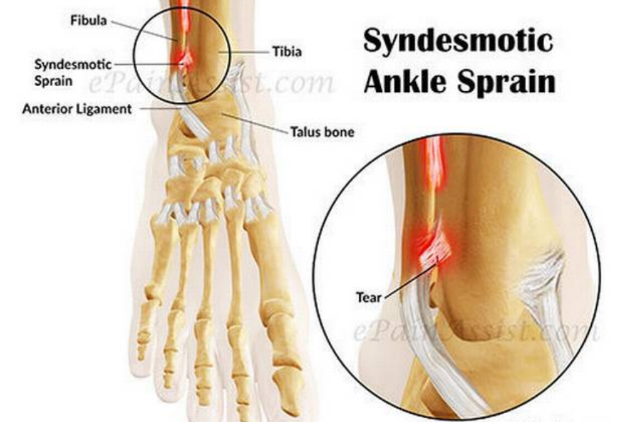
What is a High Ankle Sprain
Ankle sprains are one of the most common injuries that occur in an active population. However, there is a subgroup of ankle sprains that are rarer and hold the title of a high ankle sprain. Unlike lower ankle sprains that occur on the outside of the ankle between the fibula and the foot. High ankle sprain occurs higher up between the tibia and the fibula. A high ankle sprain can have a similar mechanism of injury (rolling the ankle outwards) but typically also have a heavier impact, which forces separation of the tibia and fibula. This causes injury the Tibiofibular ligaments and the syndesmosis (pictured). A high ankle sprain is often a dreaded diagnosis as the rehabilitation for an injury of this nature is associated with longer time on the sidelines.
Signs and Symptoms
As a high ankle sprain is often a high impact injury, it can sometimes be difficult to pick up the subtleties of a syndesmosis injury. Patient with high ankle sprains typically present with:
Diagnosis
Your physiotherapist will complete several tests aimed at determining which ligaments are injured, and the extent of their damage. If a high ankle sprain is suspected, imaging may be undertaken to confirm the injury and grade of damage. An MRI is the gold standard image for this injury, however, if this is not available, a weight bearing x-ray and ultrasound may assist in determining injury to the syndesmotic ligaments.
Treatment
In severe injuries, such as complete rupture of the tibiofibular ligaments, surgical fixation with a screw may be the best option to restore full ankle function. In the event of less significant injuries (grade 1 or 2) conservative therapy of physiotherapy has been shown to be effective. This may include immobilization in a boot, followed by graded strengthening and balance exercises to restore full movement. For this type of ankle sprain, expect a longer rehabilitation time (8 – 24 weeks) compared to the of lower ankle sprain (1 – 4 weeks) as they play a stronger role in stabilising the ankle in high impact activities such as walking, running and jumping.
If you suspect you have suffered and ankle injury, no matter how bad you think it is, it is best to get it looked at by a qualified health professional. A thorough and graded rehabilitation can allow you to return to sport quicker and reduce the likelihood of re-injury in the future.
References:
Williams GN, Allen EJ. Rehabilitation of syndesmotic (high) ankle sprains. Sports health. 2010 Nov;2(6):460-70.
Why Do My Muscles Feel Sore After a Workout?
By Michael Stizza
You’ve just increased your running training or gone hard at the gym. Now the next day when getting out of bed, your muscles ache and it’s hard to get moving. Lots of us have experienced this phenomenon, and it has a name – Delayed onset muscle soreness (DOMS).
What is DOMS?
DOMS is post exercise muscle soreness. Typically, DOMS is a dull muscle ache that is worst 24 – 48 hours after an exercise bout. DOMS can result in a short-term loss of muscle strength, muscle stiffness, or cramping type pain. This pain is generally localised to the major muscle groups being used during your workout. For example, you may feel DOMS in your legs following a big run, or in your upper body after a heavy chest workout at the gym.
What exercises give you DOMS?
Exercise that is outside the usual intensity or duration your body is used to may cause DOMS. For example, you may be running faster or longer than you have before or lifting heavier weights at the gym. Particular exercises, known as eccentric exercises are another common cause of DOMS. These are exercises where muscles are placed under load while increasing in length. Examples of eccentric movements are lowering the dumbbell in a bicep curl (biceps) or controlling your speed while descending stairs (quadriceps).
Physiology of DOMS
The actual physiological mechanism that causes DOMS is unclear. A popular explanation in the scientific literature is a repetitive microtrauma (microtears) to the muscles, which produce an inflammatory response – causing pain.
How to relieve DOMS pain
Many different treatments have been suggested to improve DOMS. From foam rolling, stretching, massage, acupuncture, rest, ice or anti-inflammatories the fitness industry has tried it all! Once again the research on the topic is quite inconsistent, so it’s about finding out what works for you. Like always, the best treatment is prevention. Where possible monitor your workout intensity each week to ensure you are gradually increasing your load by only about 10% each week to lower your risk of getting DOMS.
What if my DOMS symptoms are not improving?
If your DOMS pain in not improving after a few days, or you are finding it to be more prominent in one particular spot, it’s possible that you may have injured yourself during you last workout. Consult your local health professional to get yourself checked out before heading back to the gym.
References:
Connolly DA, Sayers SE, McHugh MP. Treatment and prevention of delayed onset muscle soreness. The Journal of Strength & Conditioning Research. 2003 Feb 1;17(1):197-208.
Andersen LL, Jay K, Andersen CH, Jakobsen MD, Sundstrup E, Topp R, Behm DG. Acute effects of massage or active exercise in relieving muscle soreness: randomized controlled trial. The Journal of Strength & Conditioning Research. 2013 Dec 1;27(12):3352-9.
Medial Collateral Ligament (MCL) Knee Injury
By Michael Stizza
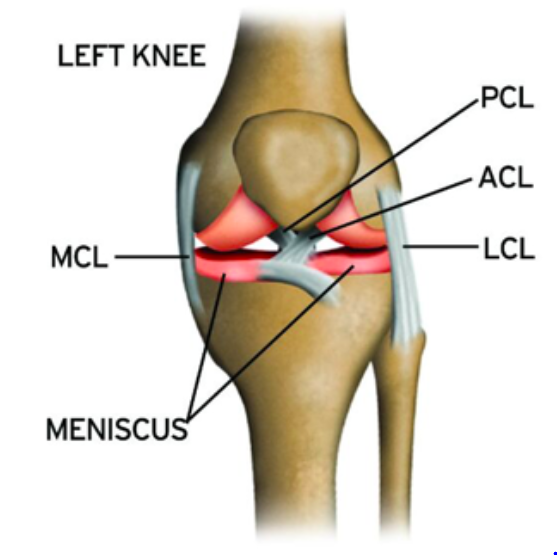
What is the Medial Collateral Ligament (MCL)?
The MCL is on of the 4 stabilising structures of the knee. Running down the inside connecting your knee and connecting your femur (thigh bone) to your tibia (shin bone), it main function is to increase the stability of your knee by limiting sideways movement. MCL injuries are common in high impact and contact sports including football and soccer and can be due to a blow or collision to the outside of the knee.
Diagnosis
To diagnose an MCL sprain or tear, your physiotherapist will complete several tests aimed at stressing and stretching the MCL ligament to determine the location and severity of the injury. Further to this, they will try to see if any other structures have sustained injuries as it is common to injury your anterior cruciate ligament (ACL) or meniscus at the same time as the MCL. Dependent on the extent of the injury, imaging may be undertaken to help grade the injury and prognosis.
Typically, MCL injuries are graded from one to three:
Prognosis
With grade 1 injuries, rest, taping and activity modification followed be a gradual strength and return to sport may be enough. More significant injuries such as grade 2 may require 4 – 6 weeks’ worth of bracing and physiotherapy before returning to sport. With the most severe of MCL tears (grade 3), the ligament may be unable to heal itself as it is non-functional. Grade 3 sprains may require surgical repair and rarely occur in isolation, so you may require surgical intervention for concurrent issues.
Overall, people who sustain an injury to their MCL have a good prognosis and often return to sport. If you suspect someone has injured their MCL, immediately rest, ice compress and elevated and book them in to see a qualified health professional who can arrange for the appropriate referrals and follow up.
References:
Kowalczuk M, Waldén M, Hägglund M, Pruna R, Murphy C, Hughes J, Musahl V, Lundblad M. Return to Play After Complex Knee Injuries: Return to Play After Medial Collateral Ligament Injuries. InReturn to Play in Football 2018 (pp. 509-524). Springer, Berlin, Heidelberg.
Osgood-Schlatter’s or Jumper’s Knee
By Michael Stizza
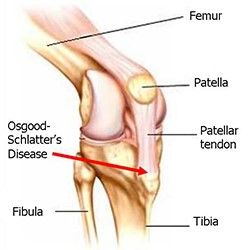
Knee pain in children is a common reason for missed game time or reduced sports participation at school. The active adolescent population, who are often playing multiple sports can be at risk of overuse injuries. Osgood-Schlatter’s refers to a specific diagnosis of knee pain in growing boys and girls that can interrupt their play time is not managed properly.
Osgood-Schlatter’s, often referred to as jumper’s knee, is common in sports where you have heavy impact and landings, such as basketball, or aussie rules football. One of the stand out characteristics is a prominent or enlarged bump just below the knee, at the top of the shin. Although initially alarming, the bump does not normally cause any long-term problems for the knee and typically resolved by itself over time.
What causes Osgood-Shlatter’s?
Repetitive jumping, landing and impact loading through the quadriceps (thigh) muscle is the main cause of this condition. This is due to traction, or pulling on the quadriceps muscles as it inserts into the bone. The cause of the bump is related to inflammation/irritation at tibial tuberosity (located at the top of the shin) around an immature growth plate. This is exacerbated by large growth spurts as muscles become tight when the bone growth around them.
Signs and Symptoms:
If you think your child is suffering from jumping related knee pain, look for the following signs and symptoms:
Management:
The good news for suffers is that this is typically not an ongoing problem, nor does it have long-term complications associated with it. Although it will eventually go away on its own, this may take up to 6 – 24 months and is very dependent on individual activity levels and growth spurts. A thorough assessment and treatment with a physio can improve symptoms and reduce time missed from sports. Things a physio may help you with are:
If you have concerns regarding any knee pain, get in touch and get it checked out so we can help to keep you, or your kids active and pain free.
Running: Common injuries, Risk factors and Biomechanical assessment
By Michael Stizza

Just started back running, or thinking about commencing a running program but concerned about injury? Many people with good intentions have started and stopped running programs due to ongoing niggles, or even more serious injuries. Here’s how physiotherapy may help you overcome these problems.
Running Injuries
Every professional and recreational runner loathes aches and pains that could be the start of an injury. Injuries of the lower limb are very common in regular runners and are the main reason for loss of training time and participation in events. Common running injuries include, but are not limited to:
Physiotherapy can be an effective way to help reduce the risk of the above injuries or can help manage them early to help keep you running better, for longer.
Why do running injuries occur?
Most overuse running injuries occur due to inappropriate training loads. This can mean increasing your load too quickly, or training inconsistently. Other risk factors can include:
If you keep suffering from ongoing, or persistent injury concerns with your running, a full body assessment may be useful in improving any inconsistencies with your muscle flexibility, strength or technique.
What’s involved in a running assessment?
A comprehensive running assessment should look at the whole body as every muscle and joint is involved in generating power and maintaining efficiency during running. This may include:
From this information, we can work on correcting the deficits linked to your injury history and give cues to improve your technique to reduce your risk of injury in the future.
Many of running’s common injuries risk factors can be modified through strength and technique improvements. Don’t let pain interrupt your training, come in and get assessed today to get back to running worry free.
Shoulder Pain: Rotator cuff tendinopathy
By Michael Stizza

So, you’ve got a sore shoulder and gone to have some scans. You’ve been told that you have a rotator cuff tendinopathy, but you’re not sure what that means. Don’t fret, you have come to the right place.
A rotator cuff (RC) tendinopathy is a common shoulder injury that comes on insidiously, with symptoms that can often be perceived as debilitating and prone to impacting daily activities and quality of life. Put simply, a rotator cuff tendinopathy is a general diagnosis of pain and discomfort of the shoulder relating to the rotator cuff.
What is the rotator cuff?
The rotator cuff is made up of of 4 muscles; supraspinatus, infraspinatus, subscapularis and teres minor. The function of these muscles is to rotate and stabilize the shoulder joint during all arm movements. When suffering from a RC tendinopathy, you may have damage, or irritation of the tendons of one, or multiple of the rotator cuff muscles. With dysfunction, or injury to the rotator cuff, you can have pain affecting how we move our shoulder and arm altogether.
How does it happen?
Due to their location and function, the RC tendons are prone to injury and overuse. The causes of overuse can be multiple and varied. The RC tendons are synergists (work together) with all the major muscles surrounding the shoulder. If there is an injury to, or weakness in one of the major muscles, the RC muscles can become overworked when trying to do the job of the larger muscles. As this occurs, the smaller rotator cuff muscles become overwork and can no longer adequately perform their stabilizing job for the shoulder joint. With altered stabilizing ability comes other symptoms such as irritation of the subacromial bursa (a fluid filled sac that decreases friction) or impingement signs, which cause pain with overhead activities.
Signs and symptoms of a rotator cuff tendinopathy:
Rotator cuff tendinopathies can present in many ways, but common signs and symptoms can be as follows:
Locating the primary origin of the problem is the first step in treatment. Your physiotherapist will look for imbalances or deficits around the shoulder to determine the cause of the problem. From here, treatment may involve manual therapy to reduce the tone, or tightness within the overworked muscles. Exercise prescription to restore full range of motion or strength to the shoulder joint and activity modification, reducing the strain on the shoulder for a short while. In some cases, your physio may use sports tape to support the shoulder while your symptoms settle, but long-term immobilization is not recommended for this problem.
It is best to seek treatment early for this problem as it is easier to correct when the symptoms are less, and the movement is still intact. So get in, get assessed, and get moving pain free today!
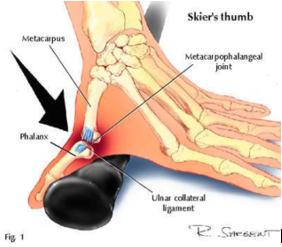
Diagnosis: Skier's thumb (Ulnar collateral ligament sprain of the thumb)
By Michael Stizza
As the cold creeps in and the snow starts to fall in the alpine regions, now is an appropriate time to talk about the aptly name skier's thumb injury. Skier's thumb, gamekeeper's thumb or simply a thumb sprain all refer to the same injury - Injury to the ulnar collateral ligament of the thumb (pictured below).
Skier's thumb is the most common injury to the thumb and it occurs when there is trauma or force directed to your thumb pushing it into hyperextension. The name skier's thumb comes from when people fall with ski poles in their hand, hitting their thumb on the ground and hitting it with a lateral force. The name gamekeepers thumb is when a ball hits the end of your thumb during sports like aussie rules, cricket or soccer - most commonly the goalkeeper.
Following a direct blow to your thumb, you may feel intense pain in your thumb joint. Other signs any symptoms include:
Treatment:
Physiptherapy management of a thumb sprain is determind by the grade of strain. Strains can occur from minor strain to complete rupture. Generally, physiotherapy treatment with include:
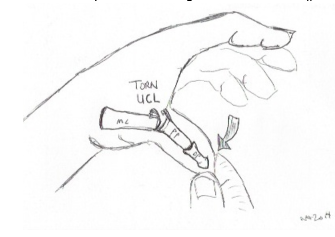
In severe cases, you can rupture this ligament in your thumb. This may or may not hurt but will cause excess joint movement, swelling and instability. When unsure, it is best to seek advise as a scan may be needed to determine the presence of a Stener lesion. A Stener lesion is when the ruptured portion of the ligament retracts, this required surgical fixation. However, if a complete rupture is present without a Stener lesion, conservative therapy may be successful.
If you have suffered an inkury to your thumb, consult your local physio or hand therapist to determine an action plan. This willreduce the risk of recurrent problems, feelings of instability and risk of osterarthrisitis in the future.
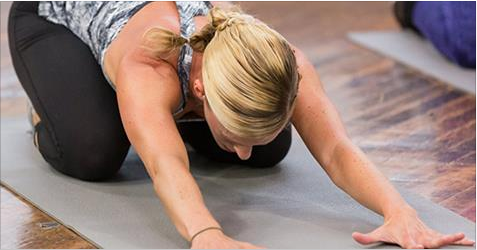
Thinking About Clinical Pilates?
By Michael Stizza
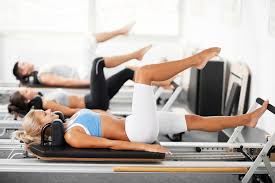
Clinical pilates is a well-researched and effective method of injury rehabilitation, prevention, general health, strength and wellness. Clinical pilates is delivered by highly qualified health professionals including physiotherapists and can assist in the rehabilitation and prevention of long term, hard to treat injuries or problems. Clinical pilates combines the use of floor exercises, reformer machines and trapeze tables to create a safe and specific rehabilitation program to suit your individual needs.
Who will benefit from Clinical Pilates?
Anyone can benefit from clinical pilates! Common concerns clinical pilates can work for are:
What to expect:
If you are interested in beginning clinical pilates, book an initial appointment with your physiotherapist. Here they will complete a full assessment to ensure you are working together to suit your needs. Typically, an initial 1:1 session will be used to determine your injury history, background, current injury, strength or range of motion deficits and goals. Then, once this is complete, your physiotherapist will take you through individually chosen exercises on reformer machines, marking the start of your clinical pilates journey. From here, another 1:1 session may be needed to allow you to become familiar with the equipment and exercises prior to joining groups.
Why you should join clinical pilates:
Clinical pilates is great amongst people of any ages, with most having improvements in function or return to sport. If you would like further information about clinical pilates, call, or book an initial assessment and get yourself back to the things you want sooner!
Heel Pain in Kids: Sever’s Disease
By Michael Stizza

Sever’s disease is the most common cause of heel pain in the growing athlete. Sever’s disease’s technical name is calcaneal apophysitis. This means that there is pain and inflammation around the growth plate (epiphyseal plate) in the heel. The heel growth plate is surrounded by soft tissue attachments, the most commonly implicated attachments are the achilles and plantar fascia. During time of rapid growth, there is increased stress on the growth plate, which can cause traction or pulling of the growth plate which makes it very sore and inflamed.
Clinical Presentation:
Typically, you child may complain of pain in one or both heels when running or walking. Pain is mostly located on the back of the heel where the achilles attaches to the bone. Squeezing the heel on either side normally elicits pain, and a child’s pain in often relieved by walking on their toes – limping. Sever’s is likely to become worse in periods of rapid growth. For girls, this is most commonly around the ages of 8 – 10 and for boys, 10 – 12 years old.

Treatment:
There are many different treatment options for Sever’s and are often considered varied on a case by case basis. Some treatment modalities include:
In most cases Sever’s will resolve without any long-term complications. It is, however, important to correct any risk factors found by your local physiotherapist to reduce the likelihood or this problem reoccurring in the future.
References:
Scharfbillig RW, Jones S, Scutter SD. Sever’s disease: what does the literature really tell us?. Journal of the American Podiatric Medical Association. 2008 May;98(3):212-23.
Hip pain – Diagnosis: Gluteal Tendinopathy
By Michael Stizza
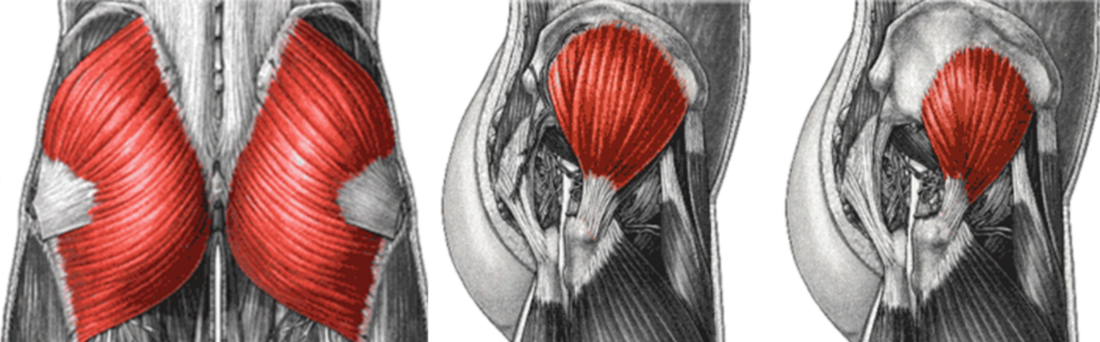
A gluteal tendinopathy is a common cause of outer hip pain. Gluteal tendinopathy affects the tendon that connects your gluteal (hip and buttocks) muscles to your hip bone. Typically, gluteal tendinopathies gradually onset and it may be difficult to determine what originally caused the pain.
Gluteal tendinopathy affects more women than men with some estimations being as high as 4:1. Several other risk factors have been proposed for gluteal tendinopathy including: women over the age of 40, increased body weight, long term back pain, biomechanical or strength deficits.
If you are suffering from outer hip pain and think it may be a gluteal tendinopathy, look for the following signs and symptoms:
Diagnosis of a gluteal tendinopathy can be done by your local physiotherapist. A physiotherapist will be able to provide you with some activity modifications, exercises and education to assist with improving the pain and get you moving better. Treatments should never completely rest an irritated tendon but aim to modify activities within pain limits.
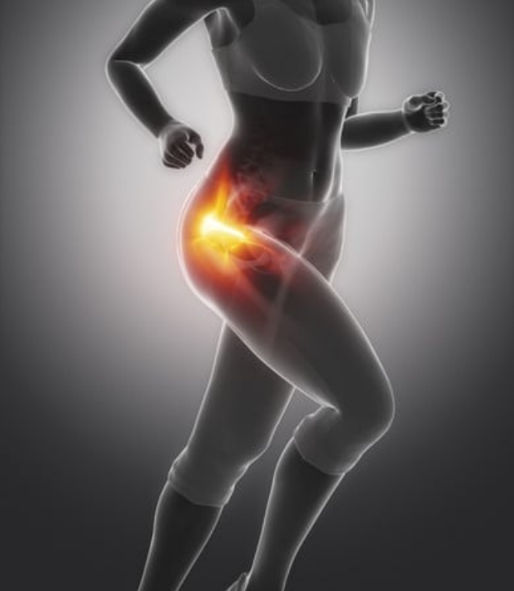
Tips for managing gluteal tendinopathy:
If you think you are suffering from this condition, it is best to get it checked out sooner rather than later to find out what needs to be done to improve you symptoms.
References:
Grimaldi A, Fearon A. Gluteal tendinopathy: integrating pathomechanics and clinical features in its management. journal of orthopaedic & sports physical therapy. 2015 Nov;45(11):910-22.
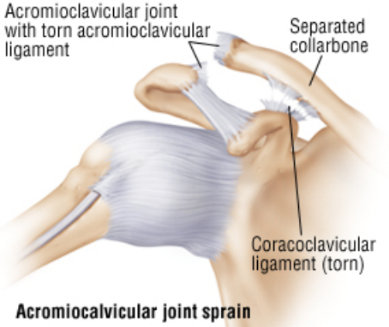
Acromioclavicular (AC) joint injury
By Michael Stizza
The acromioclavicular joint is the joint between your collar bone and shoulder blade. The AC joint is recognized as a slight protrusion above the shoulder. A cardinal sign of AC joint injury is separation, or enlargement of this protrusion as compared to the non-affected shoulder (as seen below). Injury to the AC joint can lead to pain, limited shoulder movement and instability.
What causes an AC joint injury?
The AC joint is typically injured through a blow or trauma to the shoulder. These commonly occur in sports where two players collide with a bump, or a player is tackled to the ground and their shoulder is driven into the ground. You can also stretch the ligaments by falling on an outstretched hand.
What to look for:
Severity of AC joint injury can be graded into three classifications (see diagram below):
Management:
For immediate management it is important to follow the R.I.C.E. protocol, that is rest, ice, compression, elevation. Then go to your local health professional for assessment. Here they will be able to determine severity and prognosis of the injury.
Your physiotherapist will then provide an individualised rehab program for you to undertake that will aim to restore full function. This will include joint range of motion exercises, strengthening, proprioceptive training as well as advise on when and how to return to exercise. In some cases, for grade 3 AC joint injuries, you may be referred to a shoulder surgeon for an opinion on whether surgical or conservative management would be appropriate.
For more information, ask you local physiotherapist for advice.
Jaw pain: Understanding Temporomandibular Joint Pain
By Michael Stizza
The temporomandibular joint (TMJ) is not commonly spoken about when coming to the physio, so you are forgiven if you don’t know where it is. There are two TMJ’s in the body and they are located on either side of your jaw. The TMJ is active when you are:
The TMJ is the most used joint in the body so it is common to have some jaw pain every now and then. In fact, 75% of us will experience jaw pain throughout our lives, which can be directly linked to our TMJ. Luckily, TMJ pain is mostly self-resolving over time, however, input from physiotherapy may help to speed up this process and give you relief faster.
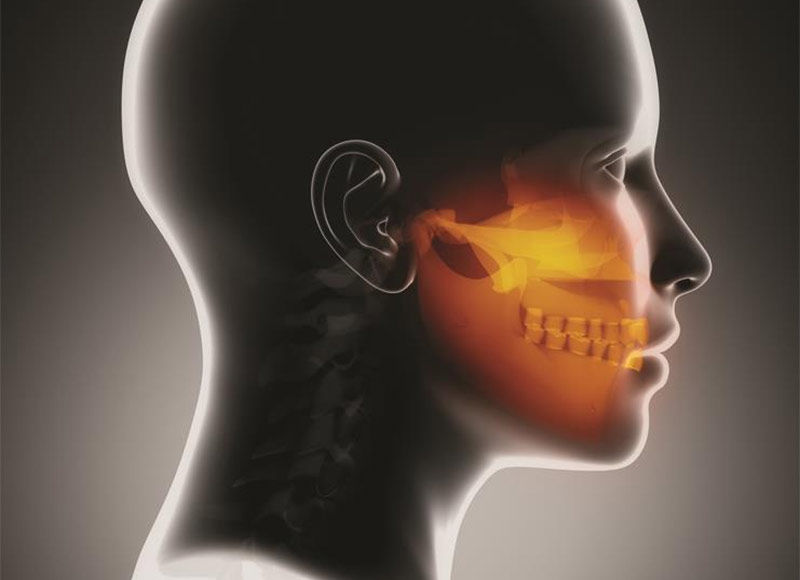
What to look for:
People with TMJ dysfunction may have pain with any of the movements listed above. It is also common for people to suffer from other symptoms such as headaches, dizziness, ear pain and neck pain. The cause of TMJ pain can vary, but it is often linked to clenching or grinding of the teeth. This may be a consequence of daily stressors, anxiety or depression.
Sufferers of TMJ pain may, or may not feel pain in their jaw. Other indicators of TMJ dysfunction include:
Some TMJ disorders can be diagnosed and treated by physiotherapy. Your physiotherapist will complete a full assessment to determine the origin of your jaw pain. They will then provide manual therapy, exercises and education to relieve your jaw pain. If your jaw pain is not amenable through physiotherapy, they can point you to the right health professional to assist with your pain. Other non-physiotherapy treatments can include splinting, surgery and medications.
While waiting to have your jaw assessed by your health professional, its important to avoid eating hard foods, stretching your jaw open wide (as with yawning), chewing gum, leaning on your jaw, stress and biting your nails. This may help reduce your symptoms in the short term while you are seeking treatment.
References:
Scrivani SJ, Keith DA, Kaban LB. Temporomandibular disorders. New England Journal of Medicine. 2008 Dec 18;359(25):2693-705.
Piriformis Syndrome
By Michael Stizza
What is it?
Piriformis syndrome refers to a pain in the hip, buttock and down the leg that occurs when the sciatic nerve is compressed by a small muscle at the back of the hip - Piriformis. This may occur when is overworked causing it to become tight, compressing the sciatic nerve, which runs behind it.
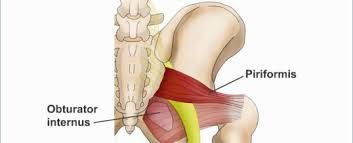
What are the symptoms?
Piriformis typically has a combination one or more of the following symptoms:
What causes it?
Most commonly, overworking the Piriformis muscle is the cause of this syndrome. This may occur if you have weakness in your gluteal, or deep hip stabilising muscles. Other reasons include:
How is it treated?
Piriformis syndrome is treated in a variety of ways by your physiotherapist. Most people will have success with conservative therapy alone with common treatment modalities found below:
Each individual may require a different combination of the above treatments in order to relieve their symptoms. If you have these symptoms listed, consult your local health professional for advice.
References:
Kirschner JS, Foye PM, Cole JL. Piriformis syndrome, diagnosis and treatment. Muscle & nerve. 2009 Jul 1;40(1):10-8.
Vertigo (BPPV) – What Is It and How Can It Be Treated?
By Michael Stizza
Vertigo is an overwhelming feeling of dizziness like you are being spun around on a desk chair, even when you are not moving. This is often accompanied by feelings of nausea and sickness in the stomach. Physiotherapy is not often the first point of call for people with vertigo symptoms but find out below how physio may be able to help you!

What is vertigo (BPPV)?
Benign Paroxysmal Positional Vertigo is one of the most common causes of vertigo. Typically, BPPV symptoms come on insidiously, but can also be as a result of trauma to the head or ear, infection or degenerative changes associated with ageing.
The symptoms of BPPV may include:
Thankfully, in most cases of BPPV, symptoms will usually subside in around 6 months. However, physiotherapy intervention can help you overcome these symptoms faster and get you back to your daily life earlier.
What can be done about BPPV?
BPPV is easily recognized, diagnosed and treated by your local physiotherapist. Just like with any other muscle or joint problem you may have; your physio can test to determine whether you will have success with treatment for BPPV. From here, treatment includes undergoing a repositioning procedure known as “Epley’s maneouver”. This maneouver may initially provoke your symptoms but will get you feeling much better by the end of the treatment session. Epley’s maneouver involves moving your head in certain positions and aims to dislodge the crystals in your inner ear so they are not disrupting your balance.
As nausea and vertigo symptoms can have many different origins, it is important to visit your physiotherapist to determine whether they can help reduce your symptoms. If your vertigo is caused by BPPV, physiotherapy has shown to be successful for treatment. However, if symptoms persist, you may need to consult your GP for further investigation.
References:
Desai DS, Chauhan AS, Trivedi MN. Role of modified Epley’s maneuver and Brandt-Daroff exercises in treatment of posterior canal BPPV: a comparative study. Int J Physiother Res. 2015;3(3):1059-64.
Male A, Beith I, Ramdharry G, Davies R, Grant R. Learning to manage Benign Paroxysmal Positional Vertigo–preferred methods, challenges and recommendations of physiotherapists interested in vestibular rehabilitation. Physiotherapy. 2016 Nov 1;102:e118-9.
Headaches: How can physiotherapy help you?
By Michael Stizza

Headaches come in many forms, but did you know that some types of headaches can be treated through physiotherapy? A sub-group of headaches, known as cervicogenic headaches are a type of referred headache that comes from dysfunction around the neck.

What can cause cervicogenic headaches?
There are many different causes for headaches that can occur. By looking out for these clinical signs you can see whether you may be suffering from a cervicogenic headache:
Physiotherapy treatment for cervicogenic headaches:
A physiotherapist will be able to determine whether your headaches is being referred from the neck joints or surrounding muscles through a hands-on assessment. Physiotherapy treatment for cervicogenic headaches is safe and shown to be effective. Treatments will be tailored to correct the deficits found on assessment.
These may include:
With these types of headaches, the sooner you seek treatment, the sooner you will feel relief. When left longer, it becomes harder to correct the deficits and relieve your symptoms. So, consult your local physiotherapist today and get relief from your persistent headaches!
References:
Bogduk N, Govind J. Cervicogenic headache: an assessment of the evidence on clinical diagnosis, invasive tests, and treatment. The Lancet Neurology. 2009 Oct 1;8(10):959-68.
Chaibi A, Russell MB. Manual therapies for cervicogenic headache: a systematic review. The journal of headache and pain. 2012 Jul 1;13(5):351-9.
Achilles Tendon Pain
By Michael Stizza

The Achilles tendon is the prominent tendon at the back of your lower leg that serves to attach your calf muscle to your heel bone. It’s role is to assist with pushing off when walking, running or providing you with power during a jump of hop. The Achilles tendon is often the cause of lower limb and heel pain, with a diagnosis of an Achilles Tendinopathy being the most common. Achilles Tendinopathy is a widespread problem that happens to sports and recreational athletes. It occurs as a chronic overuse injury that that may come on insidiously and, at worst, can impact your ability to engage in regular daily activity.
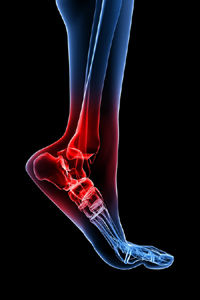
Below is what you should look for if you are experiencing pain in this region.
Signs and symptoms of Achilles tendinopathy:
Risk factors for Achilles tendinopathy:
There are several risk factors that may make you more likely to suffer from Achilles related injuries. Fortunately, many of these can be modified to reduce your symptoms. These include:
How to improve Achilles tendinopathy
If you are experiencing any pain in your Achilles tendon, it is best to consult your physiotherapist sooner, rather than later, as they can provide you with simple strategies to ensure this does not progress to a chronic problem.
References:
Magnussen RA, Dunn WR, Thomson AB. Nonoperative treatment of midportion Achilles tendinopathy: a systematic review. Clinical Journal of Sport Medicine. 2009 Jan 1;19(1):54-64.
Stephenson M. (2015) Causation and risk factors of Achilles Tendinopathy.
Anterior Cruciate Ligament (ACL) Reconstruction
By Michael Stizza
ACL injuries are common in sports where there is lots of twisting and changing directions. This year, we have seen an unprecedented amount of ACL injuries in sports with many occurring in the AFL Women’s competition. Although conservative treatment can be successful in some populations, players wanting to return to high-level sports or activity may elect to have an ACL reconstruction.

The ACL is a large ligament located in the knee that is responsible for keeping the knee stable during twisting, cutting and changing directions. ACL injuries usually occur in the sporting environment, with about 80% of these being “non-contact”. The usual mechanism of injury is when rotating whilst landing from a jump. Some signs and symptoms of ACL injury usually include:
When an ACL injury is suspected, a physio or sports doctor will assess the knee for instability. If the knee is unstable with these specific tests, an MRI can diagnose injury to the ACL and surrounding structures. If you are hoping to get back to high level sports and choose to have a reconstruction, prepare yourself for intensive pre and post-op rehabilitation.
Pre-op exercises
Optimal timing for ACL reconstructions are about 3 weeks post-injury. During this time, your muscles begin to lose their strength rapidly. It is important to maintain adequate core and lower muscle strength prior to your operation as this is directly linked to better outcomes post-surgery. A comprehensive prehab program should include:
Post-op rehabilitation
ACL rehab is a lengthy process, typically taking around 9-12 months before the injured athlete can return to sport. Rehab from surgery should be criteria driven, rather than time driven as this will allow for safe return to sport with reduced likelihood of reinjury. ACL rehab can be broken down in 5 phases:
Each person can progress through the phase at different rates. Therefore, comprehensive rehabilitation programs, with the assistance of a physiotherapist is necessary to ensure safe return to sport, or daily life with greater confidence.
References:
Cooper R. ACL Rehabilitation Guide.
Evans S, Shaginaw J, Bartolozzi A. ACL RECONSTRUCTION‐IT'S ALL ABOUT TIMING. International journal of sports physical therapy. 2014 Apr;9(2):268.
Hewett TE, Di Stasi SL, Myer GD. Current concepts for injury prevention in athletes after anterior cruciate ligament reconstruction. The American journal of sports medicine. 2013 Jan;41(1):216-24.
Shaarani SR, O’Hare C, Quinn A, Moyna M, Moran R, O’Byrne JM. Effect of Prehabilitation on the Outcome of Anterior Cruciate Ligament Reconstruction. Am J Sports Med. 2013;41(9):2117-2127.
Hamstring Injuries and Prevention
By Michael Stizza
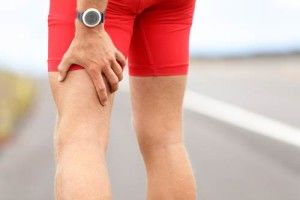
As preseason ends and winter sports like footy and soccer begin the home and away season, the training intensity begins to rise and the so does the frequency of soft tissue injuries. The dreaded hamstring tear will no doubt be on the minds of many players and coaches and is always a major contributing factor to lost time on the playing field.
The hamstring group is found on the back of the thigh and is made up of 3 different muscles – semitendinosus, semimembranosus and biceps femoris. Injuries to the hamstrings typically occur with powerful, or stretching movements during sprinting, kicking or changing directions.
Prevention
There is no amount of training that is 100% guaranteed to prevent a hamstring strain, however, there are some helpful strategies that may reduce the likelihood of injury.
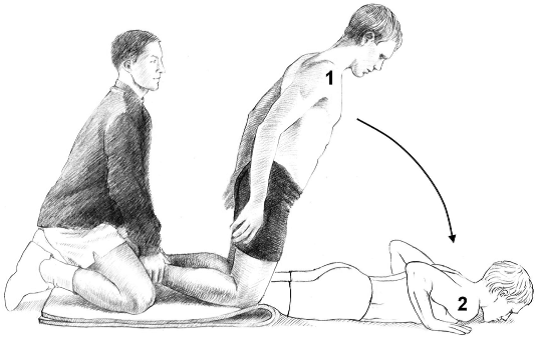
If you think you have suffered a hamstring strain, follow the basic P.O.L.I.C.E. principles as follows:
Following this, book an appointment with your local physiotherapist as soon as you can to ensure you are back out on the field ASAP.
References:
Freckleton G, Pizzari T. Risk factors for hamstring muscle strain injury in sport: a systematic review and meta-analysis. Br J Sports Med. 2012 Jul 1:bjsports-2011.
Heiderscheit BC, Sherry MA, Silder A, Chumanov ES, Thelen DG. Hamstring strain injuries: recommendations for diagnosis, rehabilitation, and injury prevention. journal of orthopaedic & sports physical therapy. 2010 Feb;40(2):67-81.
van der Horst N, Smits DW, Petersen J, Goedhart EA, Backx FJ. The preventive effect of the nordic hamstring exercise on hamstring injuries in amateur soccer players: a randomized controlled trial. The American journal of sports medicine. 2015 Jun;43(6):1316-23.
Ankle Sprains: External braces - do they help?
By Michael Stizza
Ankle sprains are one of the most common musculoskeletal injuries and are responsible for many emergency department visits each year. Put simply, an ankle sprain occurs when you roll your ankle and stretch or tear the ligaments on the outside of your ankle joint.
Common symptoms of ankle sprains include:
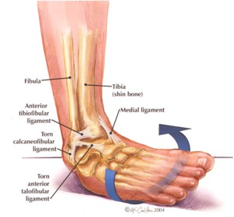
Ankle sprains can range in severity from minor, which typically improve in a few days, or severe, which may require surgery and months of rehabilitation.
If you have injured your ankle and think it might be sprained, a physiotherapist can diagnose and treat your ankle. A physio can asses the stability of the ligaments in the ankle and help manage the symptoms and rehabilitation. A physio will aim to:
Preventing recurrence
The number one predictor of ankle sprains is a previous ankle sprain, this means if you have sprained your ankle before it’s more likely to happen again. In order to reduce the rate of recurrence, a thorough rehabilitation program is needed to improve the strength and proprioception (balance) in your foot and ankle.
If you have sprained your ankle before, or looking for preventative exercises, balance training is the way to go. Research shows that when balance tasks are not included in a rehabilitation program, you are more likely to reinjure your ankle. Once you have pain free movement and weight bearing, your physiotherapist will begin proprioceptive (balance) training. A simple exercise is standing on your affected leg and balancing on one foot, which can be difficult after an ankle sprain. Proprioceptive exercises will then be made progressively harder as you improve with each session.
Do ankle braces help?
There has been a lot of interest surrounding ankle braces and whether they are effective in reducing the rate of ankle reinjury. Studies show that using external ankle support (tape or braces) do help to reduce the risk of reinjury. They do this by providing extra support and stability to the ankle joint and allow for better sensory feedback to let the brain know if the ankle is in a risky position. With the question of ankle brace vs tape, it’s a matter of preference. However, a few things to note are:
If you are having trouble with repeated ankle injuries or sprains, ask your physiotherapist about braces and taping for returning to sport. But remember this should be accompanied with a rehabilitation program for the best possible outcome.
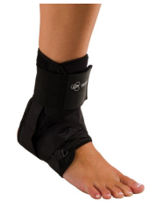
References:
Doherty C, Delahunt E, Caulfield B, Hertel J, Ryan J, Bleakley C. The incidence and prevalence of ankle sprain injury: a systematic review and meta-analysis of prospective epidemiological studies. Sports medicine. 2014 Jan 1;44(1):123-40.
Dizon JM, Reyes JJ. A systematic review on the effectiveness of external ankle supports in the prevention of inversion ankle sprains among elite and recreational players. Journal of science and medicine in sport. 2010 May 1;13(3):309-17.
Martin RL, Davenport TE, Paulseth S, Wukich DK, Godges JJ, Altman RD, Delitto A, DeWitt J, Ferland A, Fearon H, MacDermid J. Ankle stability and movement coordination impairments: ankle ligament sprains: clinical practice guidelines linked to the international classification of functioning, disability and health from the orthopaedic section of the American Physical Therapy Association. Journal of Orthopaedic & Sports Physical Therapy. 2013 Sep;43(9):A1-40.
Pilates for sport
"Whether it's in team sports such as rugby or football, individual sports like tennis/athletics or endurance events (marathon running or rowing for instance), Pilates is playing a bigger and bigger role in elite sports."
Link to article : https://www.ten.co.uk/pilates-for-sport/
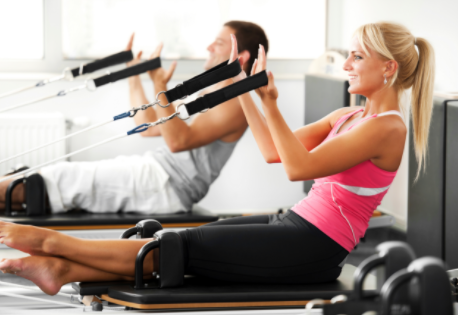
Effects of Taping on Performance and Safety
"You might not see it as much in a standard recreational gym, but in the sports setting wrapping the ankles is a common practice"
Find why and more here: https://breakingmuscle.com/fitness/effects-of-ankle-taping-on-performance-and-safety
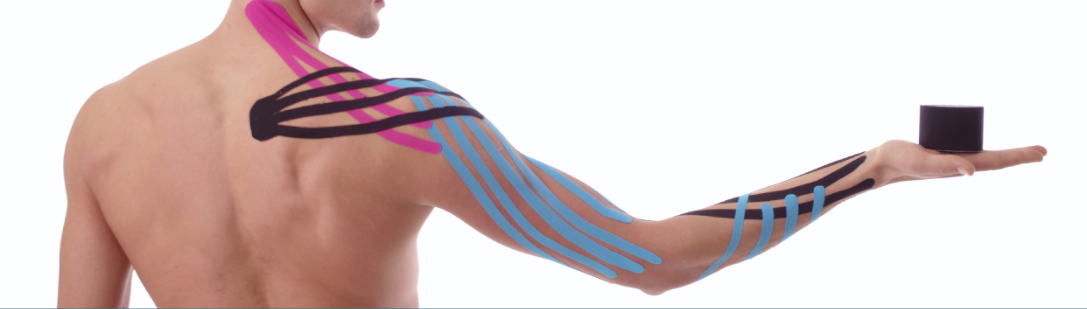
Tips on preventing shin splints
"If your a frequent runner, I'm sure you've experienced the painful strain in your shins from constant pounding and running. Over time, this pain can lead to shin splrints which can slow down the training process"
To find out more: https://urbanmile.blog/2017/08/16/preventing-shin-spints/
How important is proper exercise technique?
Phillip Heath on the importance of proper lifting techniques, and how his training has evolved.
"It's crucial. You have to first learn how to do exercises correctly. Then you have to constantly monitor your form to make certain you're doing things properly for your particular body type. Everyone says practice makes perfect."
For more: www.flexonline.com/training/phil-heath-proper-technique-and-back-training

Stretches to releave tension.
Stretching is a vital part of your fitness routine.
"There are many factors that can limit or enhance movement, including prior tissue damage, strength, stability around the joint and, of course, flexibility." says Lisa Wheeler. "That's where stretching comes in. If the muscles around the joint arent flexible, it's difficult to move efficiently."
Find out 15 great stretches and more infomation here: www.health.com/fitness/everyday-stretches